Sunday, October 25, 2015

Memory scarf for my Mum


Wow, October already. How does that happen? Seems like every year these days is faster than the one before it. Fitting then that I am posting here what I called a 'memory scarf', since I made it for my Mum last Christmas, and now it's nearly this Christmas!


I don't like buying Christmas (or birthday) presents; I'd much rather make them. To make this scarf, I searched through my fabric to find bits that I had either bought while I was with Mum, or once belonged to her, or were in some other way related to her.


The lilac raw silk (below) was a skirt of Mum's that she had made and years later given to me to wear or use...it sat in the cupboard a few years and I realised I would likely never wear it, so it moved to my sewing cupboard. I made a few pintucks across it to add a bit of texture to the scarf. 


The mauve and blue flower silk below and the dark blue silk were pieces I bought while Mum and I were in Japan back in 2008. We went on a quilting/textiles bus tour for two weeks. The flower silk was from a stall at the Yokohama Quilt Show (one of the trip's main highlights).  


The dark blue was a secondhand piece of obi silk from a shop in Tokyo that had masses of used obi pieces for very little cost, compared to the high price of the new fabric. It seemed to me that secondhand items were not valued very highly - on the same trip I bought a beautiful kimono (that I previously made a skirt from and blogged about here

The variegated ribbon (below) was from the hairpiece that Mum made me (a silk flower) for my wedding 15 years ago (thanks Mum!). The flower had seen better days but the ribbon was still good so I unpicked it and used in the scarf. 


To make the scarf, all I did was piece the different sections together (about 6.5 inches wide) after pintucking the silk. Then I sewed it inside-out to a long piece of blue satin to back it, and turned it through. So there you have it - very simple to make, and a nice trip down memory lane while making it as a bonus. 

Ciao for now, 
Kath x 


Sunday, July 19, 2015

Op shop gown to birthday dress

Is it really almost the end of July already?

Apologies for sporadic posting. I noticed I had some actual followers on Bloglovin (yay and welcome!) so I thought it might be nice to post a project for a change.

Life has been kind of getting in the way lately, as it tends to do. This afternoon I am meant to be editing a manuscript, but since I am instead watching my sick little boy lie on the couch and my brain is currently nowhere to be found, a blog post will be a nice easy way to pass the time instead.

Before: a not-too-bad dress from Yass opshop - in fact, a pretty fancy $14 one that I waited for the right week for yellow tags to be half-price, so only $7. Since as soon as I saw it I thought "ah hah! A dress for my daughter" and would be cutting it up anyway...


Ellie loves peacock feathers and prints so it was a no-brainer. She has no going-to-parties dresses to speak of, so for her 9th birthday I thought to honour the occasion with one.


Here's a closeup of the fabric. Not sure exactly but has a fairly floaty gauzey chiffony feel. The dress was lined as it is quite see-through.


After: I went for a pretty simple idea, using a bodice pattern (Simplicity 7610) and just gathering the original skirt to fit. 


Umm. Did I say simple? Everything that can possibly go wrong with gathering two layers of fabric and sewing it to a bodice, went wrong. First I sewed it to the wrong side. Then I unpicked and regathered the whole skirt with no thread in the bobbin. Then I sewed it with the inside layer on top. Oh boy, I did not have luck that day. But I finally got it together:


Using the hem offcut, I also made a scarf to drape dramatically around one's neck (though she prefers to tie it around the waist like a pirate sash).


I was very proud of my topstitching effort and the keyhole back. The button loop broke the first time she put it on, but I resewed it with more thread and it is fine now.


Here she is wearing it (with the season's fashionable accessory of a fox hat from the dressup box, naturally). It's a little big around the waist (like, about four sizes) but she does have a size 4 waist with a size 9 height so I forgive myself. Also too long, but she loves it that way.


So far the dress has seen a total of zero fancy parties. She was wearing it on the trampoline the other day. Most of the springs have parted ways with the trampoline mat, and it has morphed into a half-trampoline half-slide complete with mud pit at the bottom where they slide off the hanging edge. 

I said, "You know honey, that dress is for fancy parties."  

"Well, we don't go to any fancy parties, do we?!" came the reply. Fair cop. At least she was getting some wear out of it! 


Monday, June 15, 2015

Op shop tablecloth = new outdoor seat cushion covers

In the continuing saga of 'Things the dog ate', another victim was the ties on the outdoor bench cushion covers. (No pic though). He chewed them off more than a year ago, and for more than a year, I have been picking up the cushions off the ground when the wind blows them off or the kids chuck them off. Also, the original covers were mildewed, stained and generally festy!

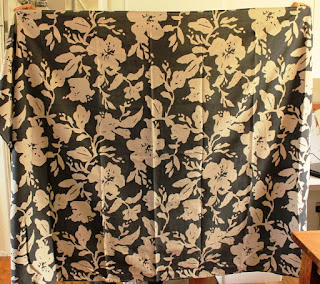
So having become tired of the pick-up game and sick of sitting on feral cushions, I found an old tablecloth at the op shop for $1. It is pretty heavyweight fabric so good enough for outdoor use. Not waterproof but the table is now under the new verandah so that doesn't matter.


Faded black with a beige-ish abstract-ish floral-ish print!


All I did was measure the length of the foam after chucking the old covers out, then made a simple boxed cover using a grey/mauve remnant for the sides. I didn't bother with a zip, just sewed up the opening by hand. Will probably regret that later.


The important part: new ties to hold on the damn things. (Dog can no longer get to the verandah so they are safe from him, and safe from cushion-chucking children.)


Here's Kai showing off the completed set. Slight improvement over the mouldy old ones!!


Now, if only the verandah could be paved as easily....


Wednesday, June 10, 2015

Title fight: Dog vs Bathmat

Before: A Sheridan bathmat, given to us as a wedding present 15 years ago, came off second-best in a recent scuffle with Buster the bathmat-chewing mutt. I was pretty annoyed as even though it was 15 years old, it was still our best bathmat!


Some close-ups of the sad mess on two of the corners...


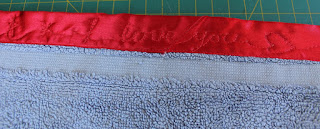
After: The result of the fight was the dog banished outside for good, a trimmed-down version of the bathmat and some red satin ribbon binding. Dog 0, Bathmat 1. 


I had some fun practising my free motion quilting along the edge. I tried some leaves...


And some stars...


And a secret message for those who bothered to look closely enough.  


I actually made this several months ago, but slow internet has put me off regular posting. In those months, no-one has yet discovered my message. So it remains a secret - at least from the residents of this house!

Tuesday, June 9, 2015

<a href="http://www.bloglovin.com/blog/12299297/?claim=pttd9yx2ejn">Follow my blog with Bloglovin</a>

Saturday, March 21, 2015

Two old skirts = linen slippers


For a while now, I've been wanting to make some nice slippers. I keep eyeing off a lovely felted pair in the Yass shoe shop, but at $70, who am I kidding. So I finally made a pair. I used this old woolen skirt from the free bin at Revolve. I know the picture is crooked. Too bad at this time of night!  


It's a black wool blend with white flecks. Nothing wrong with the skirt per se, just that it's a pencil skirt, and I don't find them comfy to wear. 


I also used a cream linen skirt from an op shop but I got it that long ago that it was well cut apart before I started photographing things first. It was basically another pencil skirt. 

The slipper pattern I used came from a lovely-looking book called Cloth. I borrowed it from the ACT library. Lots of projects specifically designed for wool, cotton, silk and linen, plus a bit of history and current uses for each type of fabric.


This is the pic of the slippers from the book:


And here is the first draft (left) and the second draft (right) of the my attempt. Can you pick the mistake?? Being one of those people with larger-than-the-average-Joe feet, the slipper patterns I see in books are always too small, so I just sized it up - but a bit TOO much the first time. 


Here they are on my dainty feet: Yep. Just a bit too big on the left there. 


The slippers were in the Linen section of the book. They are very simple to make, just a quilted sole with one layer of wadding (I put two layers in the second draft as the first was too thin). The front section is two layers sewn together along the curved back section. Then the front section and bottom of the sole are sewn inside out and the whole thing gets turned out the right way and stitched closed (supposedly with slip stitching, but hey, these are only slippers, so I slacked off and used the machine). 

Once I had the sizing better I made another left one. This one I used three layers of wadding in the sole as the other was still too thin!


In case you're wondering about the black skirt, yes, I did use it, on the bottom of the sole. You can see how nice and clean they are on the bottom after five minutes of use. Not. 


Overall they are comfy and I like them, but they are kind of annoying, because I have to shuffle around in them. If I walk normally they just fall off. So I guess they should technically be termed scuffs rather than slippers. 


I was also going to make a nice wool overnight bag out of the same book:


But the pattern sheet for the bag was  missing and I wasn't feeling clever enough to figure it out. I actually emailed the author to ask for the dimensions but never had a reply. Boo hoo. I am also tempted to make the ottoman, the pattern for which was in the book, so I have traced it and may make it one of these days: minus the cat.


I have about three bags full of tiny scraps that need to be stuffed into something - so I figure an ottoman would be a perfect thing to stuff!


Sunday, March 8, 2015

Why I love Greendale fete

Every year in October, a little rural church about five minutes out of town holds a fete. Greendale is the place to be on that day for the best trash and treasure haul you are likely to ever see. Five-cent crockery, 10-cent toys, and best of all, metres of fabric for next to nothing. Last year I picked up about 10 metres in total for about two bucks.

And I don't mean any old fabric - check out this vintage 80's cotton god-knows-what you would call it.


Here's the close up for extra impact: Cool or what!


I don't know how it ended up in someone's cast off pile. Really! Who could resist. 
Of course cheap fabric and bargain basement crockery are not all what Greendale is about. Not remotely. From a town with a population of around 101, about 200 or 300 people seem to turn up to chat, have a devonshire tea (plunger coffee and scones, $2 anyone?!), buy locally made jam and tomato relish, plants, cakes and those frilly lacy coathangers that you just can't seem to find anywhere else....I love it. 

Ok -  back to the fabric! What else could you make from this, really, other than kids' shorts. At the risk of being predictable, these are Explorer shorts. Again. Boy, have I got my money's worth from that pattern. And I even made matchy matchy ones - sort of.   

First up is Ellie's, which she wanted to personalise with applique letters. Out of cat fabric. Which she positioned very carefully to get the cats in EXACTLY the right place, as you do.  Cats in the pockets, too.


Check out that cat placement....


Don't you love how these two fabrics go together so perfectly? Umm? If you are 8, they do.


Now Kai's: being a bit of a flag freak, he picked flags for pockets. The flag fabric came from Yass Salvo's, I think. 


Just in case you couldn't see the flags too well! 


And just because this post has been full of headless shots (thanks Kai for holding the shorts up) here is one with a head. He wouldn't put the shorts on, though. They have been worn a lot since these pics were taken, though; in fact, both pairs are starting to fade! At least they no longer blind me when I hang them on the clothesline...


Sunday, March 1, 2015

Christmas shoeboxes and a cub blanket

It's been a school tradition the last few years to support the Christmas Shoebox appeal. The kids enjoy choosing small gifts to fill the boxes, such as toothbrushes, soap, colouring pencils, toys. I always try to make an item of clothing as well for something a bit extra. I think the kids don't completely fathom how a child overseas can only receive a shoebox of little things for Christmas and nothing else, but they are starting to (occasionally) realise how privileged they are...

Anyway, last year the school stopped doing the boxes, but the kids and I still wanted to, so we did. I made some Explorer shorts (about the only shorts pattern I use these days) for the boy's box, using the fish fabric from a friend's old sundress (also used on the iPad cover last year) and some plain blue, which probably came from an op shop, but I honestly can't remember. 


Back view:


For the girl's box, I made a little skirt using Simplicity 9611, which I picked up in an op shop. It's pretty simple, basically a rectangle with elastic drawstring, and a split hem detail at the side (which you can't see too well in the photo, but can see in View C in the drawing).

The fabric, from a garage sale, was an off-white cotton with little flowers. There were two bits of fabric in the same print but different colourways - pink/green and purple/orange. 


The pattern doesn't have a pocket, but I thought it needed one. I drafted the front pocket (using the second print) by tracing around a bread and butter plate to draw a circle, then cutting an arc out of the top. It still looked ho hum so I dug out some purple braid (from the op shop, of course..) Instant cute!


The last pic below is Ellie in her cub poncho/blanket. I remember having one as a Brownie back in the early 80's. I found the blanket in the Yass Salvos and after picking Mum's brain, turned it into a poncho by cutting a curved slit in the centre and adding a rib trim.


She has a way to go with covering it with badges, but we have 4 to start with at least! She did take this on a camp, but reported back that she didn't sleep under it because it was a bit itchy. I did say it was meant for wearing over clothes around the campfire, not actually sleeping in, but clearly that message was lost!


Wednesday, January 21, 2015

A Lane Raglan Tee and another Renfrew

Before: kind of hideous cowl-neck top from Yass Vinnies, I liked the colour and feel of the fabric. Hector looks a bit like a headless zombie holding this up for the photo...


After: a kind of respectable tshirt. I have forgiven Buster his heinous crime from my previous post (or maybe this photo was taken beforehand, I can't really remember).


The pattern is the Lane Raglan from Hey June. It's pretty popular in the sewing blog world. Very simple, I probably had several like it in the cobwebby pattern box but I am a bit of a sucker for the instant gratification of ordering a PDF pattern and receiving it a few seconds later. 


There wasn't enough of the green to get the sleeves out, so I used black ribbing, which I like the look of. Also for the neckline binding. The pattern was easy to follow and make but I don't like the way it has you finished the neckline  - you sew the neck binding on the flat and then sew up the last shoulder seam, it leaves a bumpy finish on the neckline that I had to sew down by hand. Next time I will just do it in the round.


Before #2: some cream and caramel (i.e light brown and medium brown) knit from Jamison Salvos in Canberra.

In the same box was a length of beige knit. 


After: another Renfrew top. I blogged about one of these here last year. (I made this one last year too, but am a bit sporadic when it comes to blogging completed projects, as you have no doubt noticed. I blame the slow-as-a-wet-week internet connection).


I like this one better than the previous version. I took out some of the excess sleeve length. I kept the overall length the same, but the difference in fabric ( this stuff is very stretchy) seems to have made it longer than the first one.


I was MOST impressed with myself with the stripe matching up the left hand side. Not perfect, but pretty close.

Not so much impressed with the right side.... you win some you lose some!


I also tried hard to cut the neckband so as to have an even stripe. I managed that pretty well if I do say so myself. It looks a bit wrinkled here but it's not actually.


Unfortunately the fabric was a little TOO stretchy and since sewing has lost of lot of its shape. But it's so snuggly soft I use it as a pyjama top. So no biggie.